LENGTH OF LESSON:
Two to Four classroom periods
GRADE LEVEL:
5-9
CREDIT
By John Versluis and Ralph Gibson
OBJECTIVES:
Students will understand the following:
- The importance of the association between artifacts, ecofacts, features, and the landscape.
- How maps record these associations.
- How archaeologists create maps.
- How archaeologists connect site maps to larger maps of the region and to the world.
MATERIALS:
A tutorial discussing each of the objectives above is provided below. Other materials needed are:
- A compass
- A Tape Measure (at least 50)
- A protractor
- A ruler (inches or metric)
- A pencil
- An eraser
- Graph paper
- An 8 inch spike or a long nail
- A small piece of colored ribbon
- Hammer
- 6 pennies with different dates
ARCHAEOLOGICAL MAPS
INTRODUCTION
Map-making is one of the most important skills an archaeologist learns. Maps are important to archaeologists because maps illustrate the connection between artifacts , ecofacts , features , and the landscape. These connections, or associations, are sometimes referred to as spatial relationships by archaeologists. Archaeological maps also record associations on a much larger scale, such as the relationship between two or more ancient villages, settlements, or small camps. The information that maps record is perhaps more important than all the other information recorded by archaeologists.
The skill of map-making has evolved with technology. In the past, archaeologists used just a compass, a tape measure, a ruler, a pencil, and a piece of paper. Today, an archaeologist might use a laser theodolite and a computer to map a site. However, these tools are very expensive, and most archaeologists are working on a limited budget, so the use of compasses and tape measures to hand draw maps is still very popular.
Drawing a map is not the last step in creating an archaeological map. In order for the map to make sense, it must be placed within a larger map. Archaeologists looking at the map need to know where it is in relation to other sites, natural features such as rivers or lakes, or in relation to cities or towns. There are several ways in which this is done using several different types of large-scale maps.
The importance of association, the tools of map-making, and how to place a completed site map within a large-scale map are the three main topics that will be discussed below. Following this tutorial will be links to exercises that students may perform alone at home or at school as part of a class project. The map-making exercises begin with very simple tasks to familiarize students with a compass and progress to more complicated exercises in which students will actually draw an archaeological map to scale.
THE POWER OF ASSOCIATION
Imagine if an archaeologist discovered a stone tool while carefully excavating a site. There are several questions the archaeologist would try to answer right away: What kind of rock was the tool made from? What kind of tool is it? What culture created the tool? How long, wide, and heavy is it? When was it made? Archaeologists record the answers to such questions if such answers are known. But the two most important questions an archaeologist will answer in regards to our newly discovered stone tool is: Exactly where was the stone tool found? What else could it be associated with? If our stone tool was discovered all by itself, with no other artifacts, eco-facts, or features, then an archaeologist would have just a stone tool. Does this mean our tool isn't associated with anything? No, everything is associated with something. It only means that the tools association isn't known yet. This means it is even more important that all the questions listed are answered and recorded. This way, an archaeologist in the future might be able to determine what the tool was associated with through a modern investigation using tools and techniques that were not known or used when the site was originally surveyed or excavated. Sometimes association is very clear. Imagine our stone tool was found with an animal's bone. It's possible that the tool may have been used to butcher or to kill the animal. If this were true, further investigation might reveal more bones, debitage , and even more stone tools. The bones themselves might show evidence of butchering through small scratches or cut-marks. Perhaps our stone tool was used or left in a settlement of some kind, like a pit-house or a pueblo . In this case, our stone tool would be associated with the remains of those structures.
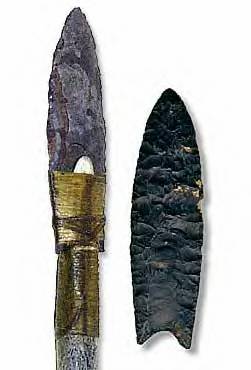
Some associations are not so clear. Let's go back to our stone tool being found with nothing else around it. What could it possibly be associated with? First, the type of stone tool might give us a clue as to who made it. One of the most recognizable stone tools is a Clovis Point (fig. 1). This stone tool was used from about 11,200 years ago to 10,900 years ago and represents part of the tool-kit of the earliest known culture in the Americas. It is a large spear point, has a curved base, and is fluted . If this were our stone tool, we would know that it was associated with the Clovis culture and was most likely made between 11,200 and 10,900 years ago.
If the stone tool itself were not identifiable to a particular culture or time period, then the next possible lead for association would be the rock source. In other words, what kind of rock is it, and where is that kind of rock found? Stone tools can be made from many different rock types: Obsidian , chert , basalt , even quartz, just to name a few. If our stone tool were a green chert, then we'd have to look for local sources of such a rock. In this case, an archaeologist would most likely consult with a geologist to find out if such a rock outcrop exists in the area. If it doesn't, then the archaeologist would have to look for such a source farther away. If the source is found several miles from where the stone tool was discovered, it would mean that either the culture that made the tool traveled to get the rock, or perhaps the culture came to possess the rock through trade with another culture that resided near the source of the rock. In either case, our stone tools association would reveal a lot of information about the culture that produced it. Aside from the outcropping of the source rock, an archaeologist would also look at other archaeological site reports in the region to determine if tools made of the same rock type were found in those sites.
Why is association so important? Because a stone tools association with other artifacts, eco-facts, features, or other sites tell us so much more about who, what, when and where. The power of association lies in its ability to answer questions that may not have been answered yet by archaeologists working on a site. An entire site may be mapped as a confused array of debitage and features in which no one could confidently argue when the site was created or even what culture produced it. But one little stone tool that is temporally diagnostic might reveal all those answers just through its association with the rest of the site. Associations between things reveal much about the past; they help us to recreate past lifeways and cultures; they help us tell a story about a place and a people that existed a long time ago. Maps illustrate that story. Their importance in archaeology is in bringing to life each association, not only within the site itself, but also between the site and the world around it.
THE TOOLS OF MAP-MAKING
Perhaps the most important tool an archaeologist carries is a compass. For over a hundred years, the compass has been a part of the archaeologist's tool-kit. Compasses are used by non-archaeologists to keep from getting lost in the wilderness and are usually used in conjunction with maps. Archaeologists, however, use compasses to map and record sites. Armed with a compass, a tape measure, a ruler, a pencil, a protractor, and a piece of paper (usually graph paper), an archaeologist can map any site of any size to scale. Today, with advancements in computers and computer programming, an archaeologist can map a site with a laser guided theodolite and a computer. If an archaeologist can't afford the laser-guided theodolite, then he or she can program the coordinates of all recorded points in a site and a computer will produce a map in a fraction of the time it would take to do so by hand. But these are expensive tools and archaeologists are usually limited to working on a tight budget. Most archaeologists still draw their own maps by handsome with just a compass and a protractor, others with a transit or alidade . This tutorial will focus on the more popular compass and protractor.
Like any circle, the compass is broken up into 360 degrees. The top line when pointing north is both 0 degrees and 360 degrees. East is 90 degrees; south is 180 degrees; and west is 270 degrees. When recording a site, archaeologists pay attention to directions such as north or west, but the exact bearings are what is recorded. Northwest doesn't accurately describe the direction a stone tool is found from another stone tool, but a bearing of 310 degrees does. The tape measure is also a vital tool because archaeologists measure the distance between things.
Once the bearing and distance of every artifact, ecofact, and feature is recorded, an archaeologist is ready to create a map. But bearing and distance from what? Another tool used by archaeologists is the datum . The datum is a point set in the field, and later on the map, from which to record the site. The datum is usually a long spike with a colored ribbon attached to it. Sometimes archaeologists will place the datum somewhere near the middle of the site while others will place the datum in one corner of the site in order to create a grid of the site. In either case, the datum is the point from which everything is measured, and from which all bearings are shot. On the map, a datum will be marked as a small triangle.
Now that all the bearings and distances of each artifact, ecofact, and feature from the datum have been recorded, the archaeologist is ready to draw the map. The archaeologist must first determine at what scale to draw the map. If the site is a small scatter of stone tools and debitage, a scale such as one inch = one foot might work. In this case, if an artifact were one foot from the datum, it would be recorded as one inch away on the map. Once the scale has been determined, the archaeologist is ready to begin drawing the map. The datum should be placed first, either in the lower left-hand corner of the paper or in the center. If an archaeologist sets the datum in the center of the site in the field, then the datum should be placed in the center of the paper. All maps should be drawn with the top of the paper signifying north.
The archaeologist would then place the protractor over the datum, aligning the 0 degree line so that it is pointing straight up on the paper, parallel with the sides of the paper. Then, he or she would make little marks at each bearing number that an artifact, eco-fact, or feature is from the datum. Then, the archaeologist would place a ruler so that one edge is on the datum and the other on one of the little marks. They would then draw a faint line from the datum through the bearing mark making this line go almost off the paper. The archaeologist would draw a line for each mark. Then, each artifact, eco-fact, or feature would be placed on the line according the recorded distance to scale. If the scale is 1=1 (one inch = one foot), for every foot an artifact is from the datum, one inch will be measured on the map. Once every artifact, ecofact, or feature is placed on the map, the faint lines are erased. Next, the archaeologist might add natural features, such as the slope of the terrain, the location of trees, large rocks, or hills.
WHERE IS IT?
Placing the site map within the context of larger maps is the next important step in map-making. Creating a map to scale does little if the site can't be located in its own region. Also, the association of the site to other sites nearby or far away cannot be determined if the site is not placed in a larger geographical context. To do this, one must understand the different ways in which the world is divided geographically. Latitude and longitude is perhaps the best-known way in which the world is divided. Lines of latitude on a globe run east-west, while lines of longitude run north-south. Each is further broken up into hours, minutes, and seconds, giving each point on the earth its own latitude and longitude designation.
Perhaps the second most popular is UTM (Universal Transverse Mercator) coordinates. UTM coordinates break up the earth into grids called zones. Points within each zone are plotted by meters on an east-west axis, called an easting, and on a north-south axis called a northing. What makes this particular mapping system so popular is that these locations can be easily accessed using a hand-held GPS (global positioning system) device (figure 2). This makes it the favorite of most archaeologists. In the past, archaeologists had to tie their maps to natural features or brass survey markers set in the ground. Now all an archaeologist has to do is turn on the GPS device, stand over the datum, get a reading, and record the exact position of the datum. This places the site within its region and the world. So another important tool used by archaeologists is the GPS device. How does it work? Basically, the device calculates its position by receiving signals from at least two satellites orbiting the earth. Through triangulation the GPS device is able to calculate the zone and the easting and northing measurements. Although two satellites can give a reading, accuracy in plotting a position increases with the number of satellite signals received by the GPS device. Once the GPS device calculates the northing and easting, the archaeologist uses a UTM template to plot the position on a map. The UTM template is a plastic guide that is placed over the map. The northing and easting is then plotted using the measuring guide on the template.

THREE DIMENSIONAL MAPS
Through excavation, archaeologists investigate spatial relationships on a three dimensional level. Here, relationships are mostly temporal . Those artifacts found at lower levels are usually deemed to be older than artifacts at higher levels. Archaeological maps often record these relationships as well. Three-dimensional maps are being produced more often with good computer programs, but are rarely hand-drawn. Usually, an archaeologist hand-drawing a multi-level site will draw each level two-dimensionally. Thus, for one site, an archaeologist might draw ten maps if there are ten levels excavated. For the purposes of this tutorial and the following exercises, only two-dimensional maps have been considered.
CONCLUSION
The creation of maps is the most important skill an archaeologist learns because maps are one of the most important pieces of evidence used by archaeologists to recreate past human lifeways and to reconstruct past human cultures. Maps illustrate spatial relationships associations that are key to understanding how components in a site are connected within the site, and how a site is connected with the world around it. Maps record this information. The tools used by archaeologists to create maps are varied. Most, however, prefer to draw maps by hand using a compass, a tape measure, a protractor, a ruler, and a pencil. The GPS device is another tool used by archaeologists to place the site within a larger context. It is important to note that although a map is created and used so that the site and components in the site can be found again, it is produced primarily to record spatial relationships. These relationships are not merely two-dimensional. When excavating, archaeologists record artifacts at different levels.
On the main page of this website there is an archaeological map of Tranquility Base. This map is based on the U.S. Geological Survey map of the site that was produced after the astronauts returned to earth. This map was not created using the methods outlined in this tutorial simply because it was not recorded by the astronauts and no one has since returned to record it. So instead of precise measurements, years of research combined with some educated guesswork went into its creation.
VOCABULARY
-
Alidade A surveying tool with a telescopic site that determines direction.
-
Artifact Any object manufactured or modified by human beings.
-
Assemblage - All of the artifacts found at a site, including the sum of all subassemblages at the site.
-
Basalt - A dark, fine-grained igneous rock
-
Bearing - The horizontal of one point with respect to another point.
-
Chert - A light colored variety of cryptocrystalline quartz.
-
Cross-Dating - Dating of sites by means of objects or associated artifacts of known age.
-
Datum - A location from which all measurements on a site are made.
-
Debitage - Small rock chips that are the waste by-products resulting from the manufacture of stone tools.
-
Ecofact - Archaeological finds that are of cultural significance but were not manufactured by humans, such as bones and vegetal remains.
-
Features - An artifact such as a house or a trail that cannot be removed from a site.
-
Fluted - Projectile points with the removal of a small channel at the base of the point. (see figure 1 in this sections tutorial).
-
Obsidian - Black volcanic glass.
-
Outcrop - Exposed portion of a rock formation.
-
Pithouse - Underground dwellings built by Native American cultures.
-
Provenience - The position of an archaeological find in time and space, recorded three-dimensionally.
-
Pueblo - Above ground dwellings built by Native Americans in the American Southwest.
-
Site - Any place where objects, features, or ecofacts manufactured or modified by humans are found.
-
Temporal - Of or relating to time.
-
Temporally Diagnostic - Artifact or feature that is recognized as having been manufactured by a particular culture in a particular period or time.
-
Theodolite - An instrument used to measure horizontal and vertical angles.
-
Transit - A Theodolite with the scope mounted so that it can be transited.
-
Triangulation - Any operation for finding a position or location by means of bearings from two fixed points a known distance apart.
-
Archaeology Magazine for Kids Online
http://www.digonsite.com/ -
Exploring the Moon: Apollo Missions
http://www.lpi.usra.edu/expmoon/apollo_landings.html
-
Title: In the Beginning: An Introduction to Archaeology
Author: Brian M. Fagan
Published: 1994
-
Title: Archaeological Field Methods: An Introduction
Author: William S. Dancey
Published: 1981
-
Title: Ancient North America: The Archaeology of a Continent
Author: Brian M. Fagan
Published: 1995
-
Title: Schaum's Outline of Theory and Problems of Introductory Surveying
Author: James Wirshing
Published: 1985
-
Title: Datums and Map Projections
Author: Jonathan C. Iliffe
Published: 2000